Tag: Installation Planning

  • Soccer Air Dome Installation and Design

    Soccer Air Dome Installation and Design

    You’re considering a soccer air dome for your facility, but the complexity of installation might surprise you. From securing proper zoning permits to calculating precise ground dimensions, there’s more to this project than inflating a massive structure over your field. The $1.5-4 million investment demands careful planning, and one overlooked detail during site preparation could derail your entire timeline. Before you commit to this game-changing addition, you’ll need to understand what separates successful installations from costly disasters.

    Soccer Air Dome Site Planning: Dimensions, Permits, and Prep Work

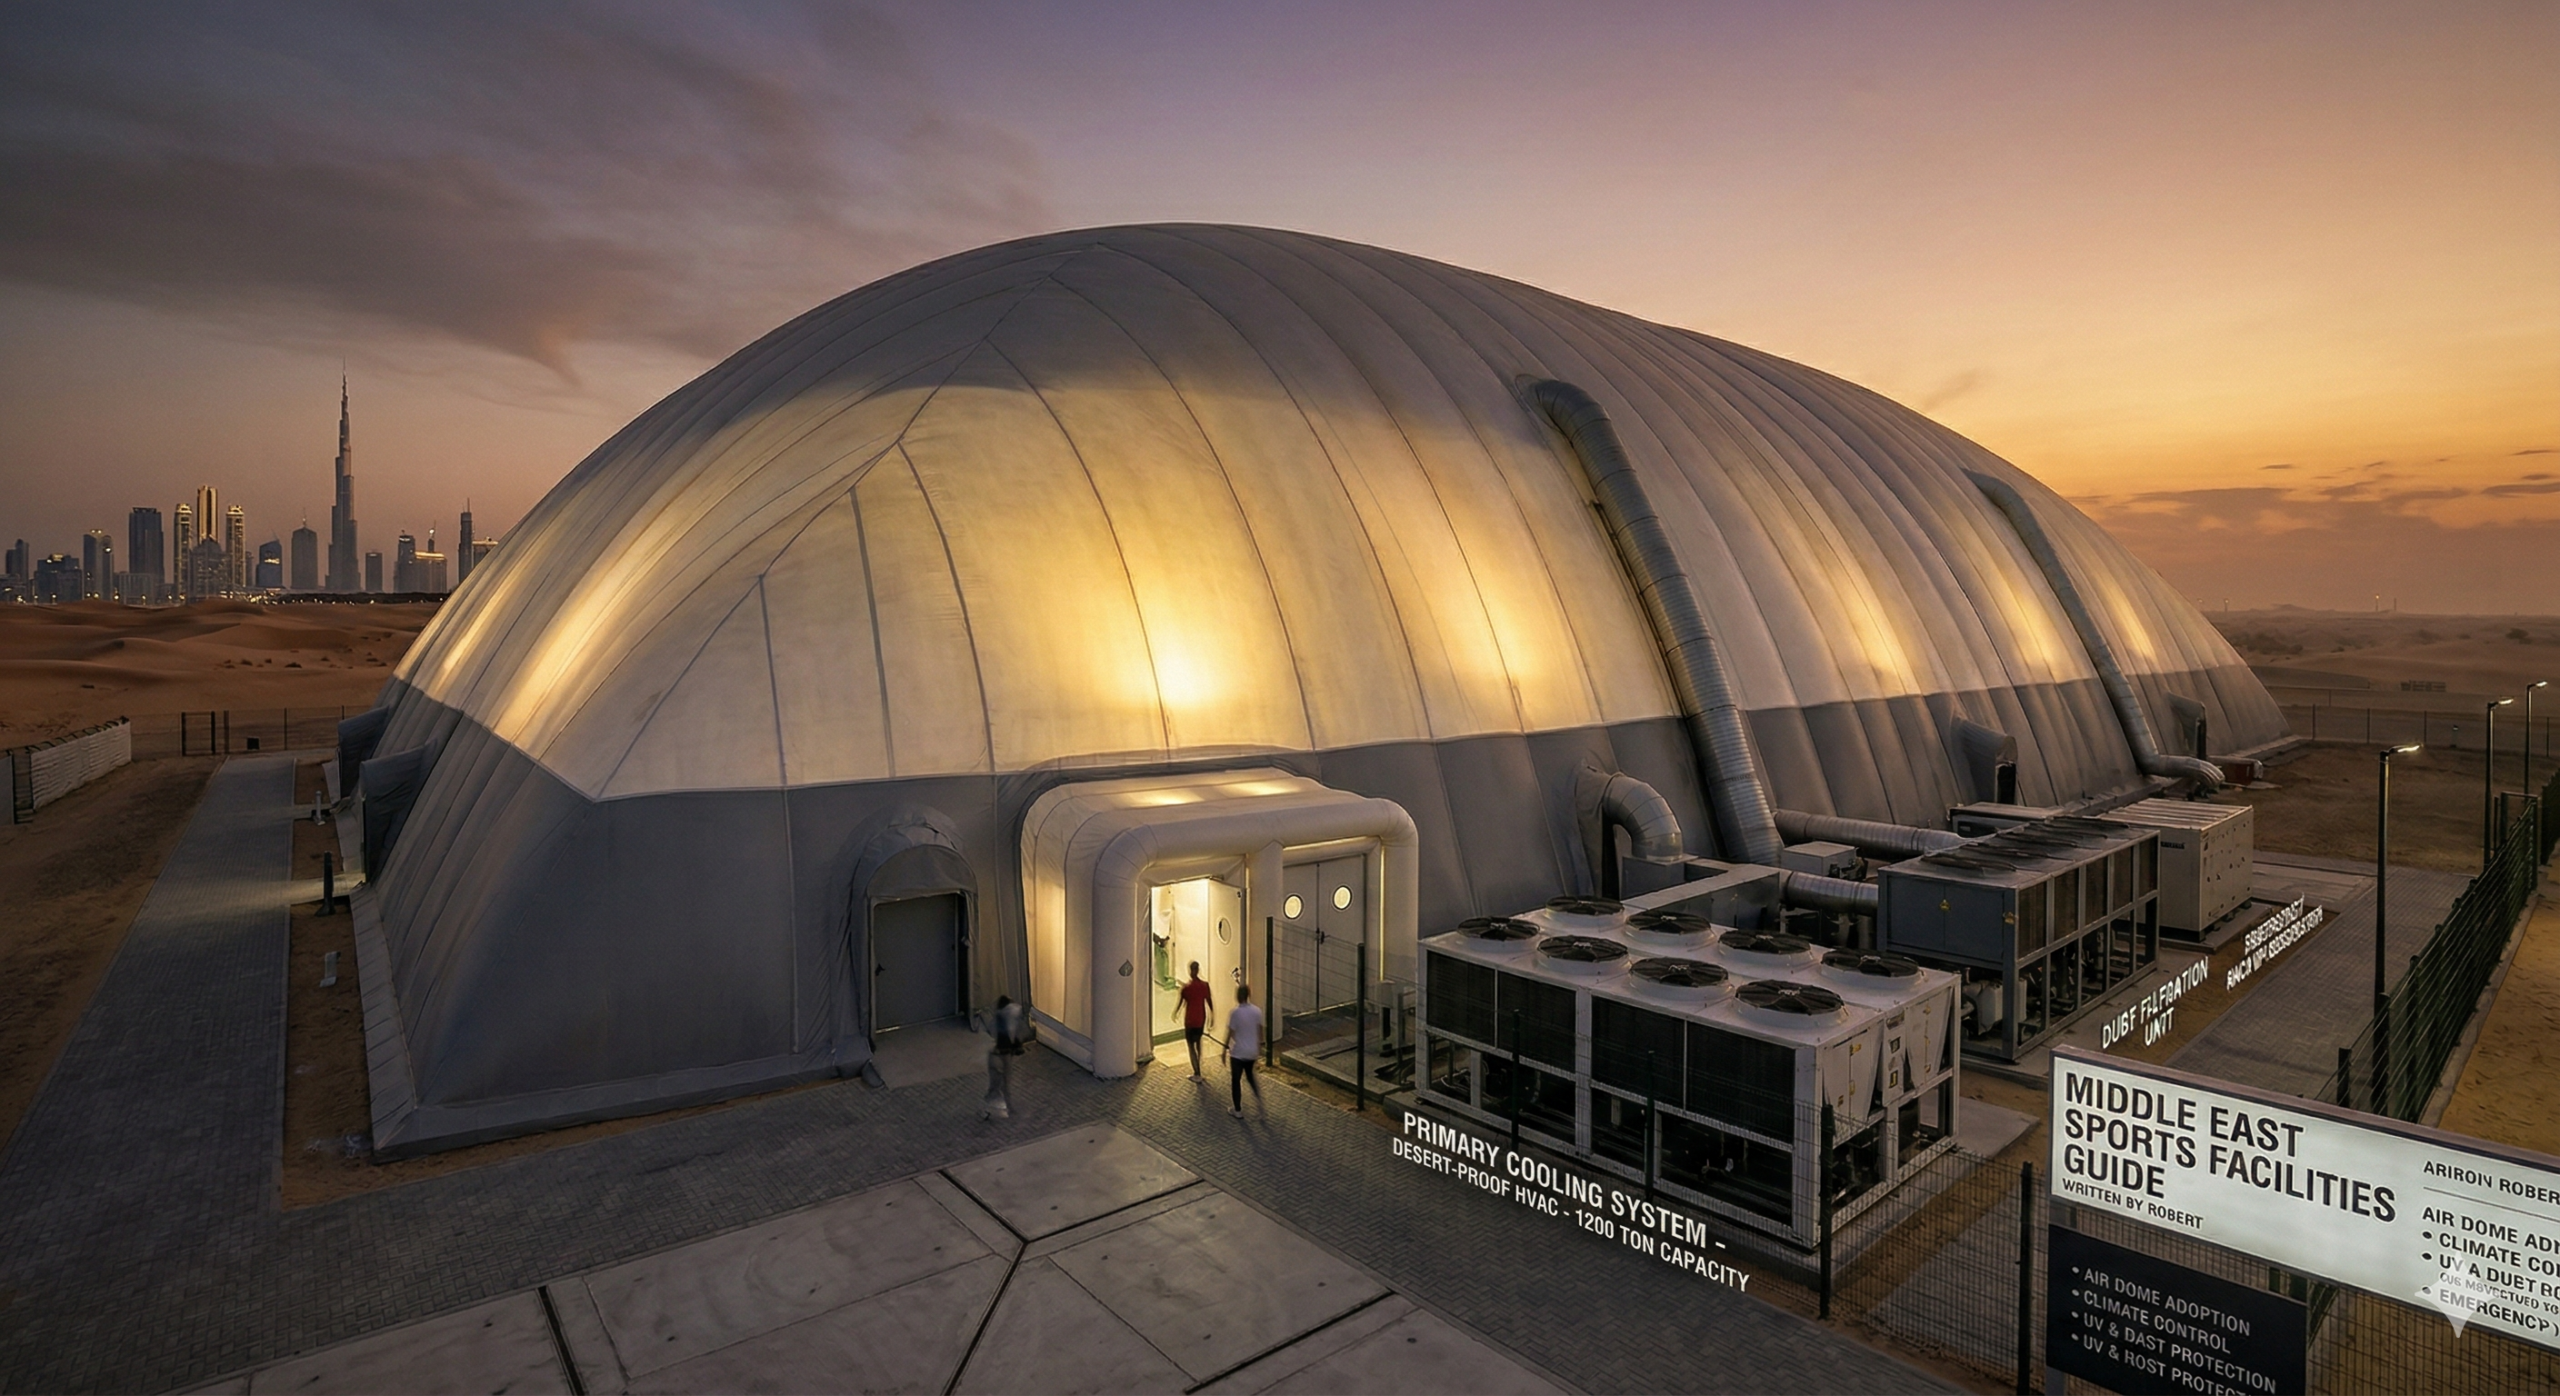
    Before you can install a soccer air dome, you’ll need to secure a site that measures at least 240′ x 360′ (73m x 110m) to accommodate a full regulation field. This translates to roughly 86,400 square feet of ground space for your soccer air dome installation.

    Start by obtaining proper zoning permits and building approvals from local authorities. Most municipalities require detailed engineering plans showing the dome’s foundation requirements and safety systems.

    You’ll also need environmental assessments if the site has drainage concerns.

    Prepare the ground by leveling and compacting the surface to create a stable foundation. Install proper drainage systems to prevent water accumulation.

    Consider utility access for electricity, heating systems, and backup power. Plan for adequate parking and access roads for maintenance vehicles during construction and ongoing operations.

    Soccer Air Dome Installation Costs and Project Timelines

    Once you’ve completed site preparation, you’ll face installation costs ranging from $1.5 million to $4 million for a full-size soccer air dome.

    Your soccer bubble facility’s price depends on several factors, including fabric quality, foundation requirements, and mechanical systems complexity.

    Installation typically takes 4-8 weeks once materials arrive on-site. You’ll need specialized crews for foundation work, fabric installation, and mechanical systems integration.

    Weather conditions can greatly impact your timeline, so plan accordingly.

    Key cost factors include:

    • Foundation and anchoring systems – Concrete footings and tie-down infrastructure
    • Fabric membrane quality – Single vs. double-wall insulated options
    • Climate control systems – Heating, ventilation, and pressurization equipment
    • Lighting and electrical – LED sports lighting and power distribution

    Expect additional costs for permits, engineering, and ongoing maintenance contracts.

    Why Soccer Air Domes Work: Performance Benefits Year-Round

    While outdoor soccer fields sit unused during harsh weather conditions, your air dome facility maintains perfect playing conditions throughout the entire year.

    You’ll eliminate weather-related cancellations that disrupt training schedules and game plans. The controlled environment protects players from extreme temperatures, wind, and precipitation that can compromise performance and increase injury risks.

    Your soccer field cover creates consistent surface conditions, allowing players to develop technical skills without adapting to varying field states.

    The stable 50-65°F temperature range prevents muscle stiffness and maintains ideal ball behavior. LED lighting guarantees visibility remains constant regardless of outside conditions or daylight hours.

    You’ll maximize facility utilization, generating revenue year-round instead of seasonal operation.

    Teams can maintain intensive training schedules, improving player development and competitive performance through uninterrupted practice sessions.

    Operating Your Soccer Air Dome: Maintenance and Energy Costs

    Three primary cost categories will define your air dome’s operational budget: energy consumption, routine maintenance, and seasonal preparations. Your indoor soccer dome requires constant air pressure and climate control, consuming approximately $8,000-$15,000 annually in electricity costs depending on regional rates and facility size.

    Regular maintenance prevents costly emergency repairs while ensuring player safety.

    Key Operating Considerations:

    • Blower system maintenance – Monthly filter changes and quarterly professional inspections prevent system failures
    • Membrane care – Annual cleaning and patching extends dome lifespan to 15-20 years
    • Heating optimization – Programmable thermostats reduce winter energy costs by 20-30%
    • Emergency protocols – Backup generators and repair kits minimize downtime during equipment failures

    Budget $12,000-$25,000 annually for thorough operations, including utilities, maintenance contracts, and consumables.

  • Sports Dome Installation Timeline Planning

    Sports Dome Installation Timeline Planning

    You’re probably thinking a sports dome installation is straightforward—order it, set it up, and you’re ready to play. But here’s what most facility managers don’t realize: that simple timeline can quickly become a logistical nightmare without proper planning. Between permit delays, weather disruptions, and coordination challenges, your 6-8 week project could stretch into months. The difference between a smooth installation and a costly disaster comes down to understanding what really happens during each phase.

    Complete Sports Dome Installation Timeline: 6-8 Weeks

    When planning your sports dome project, you’ll need to allocate 6-8 weeks for complete installation of a 20,000 square foot air-supported structure.

    Your air dome installation timeline begins with weeks 1-2 dedicated to site preparation and foundation work.

    Week 3 involves dome delivery and thorough inspection of all components.

    The sports dome construction schedule continues with weeks 4-5 focusing on frame assembly and inflation procedures.

    Week 6 completes your dome setup timeline with systems commissioning and final testing.

    However, you must factor in additional time for permits, which can extend your project by 2-4 weeks depending on local requirements.

    It’s essential to avoid scheduling installation during deep winter months when weather conditions can greatly delay construction progress and compromise safety standards.

    Site Preparation and Foundation Installation (Weeks 1-2)

    Your sports dome project begins with thorough site preparation during the first two weeks of installation.

    You’ll need to clear and level the designated area, guaranteeing proper drainage and soil compaction. The contractor will excavate for foundation trenches, typically 18-24 inches deep, following your dome’s specific requirements.

    Foundation installation involves pouring concrete footings and anchor points that’ll secure your dome structure.

    During tennis bubble installation time, utilities like electrical conduits and plumbing rough-ins are positioned before concrete curing. You’ll also complete any required underground infrastructure during this phase.

    Weather conditions greatly impact this timeline—wet or frozen ground can delay excavation.

    Your contractor should coordinate material deliveries and guarantee all foundation work meets local building codes before proceeding to the next installation phase.

    Delivery, Assembly, and Dome Inflation Process (Weeks 3-5)

    Once your foundation has properly cured, the dome delivery and assembly phase begins during week three with the arrival of your air-supported structure components.

    You’ll receive the fabric membrane, inflation equipment, and anchoring hardware for inspection before installation begins.

    Week four marks the start of frame assembly, where technicians position the membrane over your foundation and secure anchor points.

    This process requires careful coordination to prevent fabric damage and guarantee proper alignment with your foundation bolts.

    During week five, you’ll witness the inflation process as powerful fans gradually raise the dome structure.

    The membrane takes shape slowly, requiring continuous monitoring of air pressure and fabric tension.

    Weather conditions greatly impact this phase, so installation teams often schedule inflation during ideal wind and temperature conditions for safety and efficiency.

    Building Permits Add 2-4 Weeks to Installation Start

    Before any installation work can begin, building permits represent the most time-consuming aspect of your sports dome project timeline. You’ll need to factor in 2-4 additional weeks before your Week 1 site preparation can commence.

    Permit Type Timeline Requirements
    Building Permit 2-3 weeks Structural plans, engineering stamps
    Electrical Permit 1-2 weeks Electrical schematics, load calculations
    Foundation Permit 1-2 weeks Soil reports, foundation drawings
    Fire Safety 1-3 weeks Exit plans, sprinkler layouts
    Zoning Approval 2-4 weeks Site surveys, variance requests

    Submit all permit applications simultaneously to minimize delays. Complex projects requiring variances or special approvals can extend this timeline considerably. Plan your permit submission strategy early, as these approvals directly impact your installation start date and overall project completion.

    Winter Installation Challenges That Delay Your Project

    While summer and fall offer ideal installation conditions, winter weather creates considerable obstacles that can double your sports dome project timeline. Freezing temperatures make foundation work extremely difficult, as concrete won’t cure properly below 40°F without expensive heating systems and additives.

    Snow and ice create hazardous working conditions that halt construction for safety reasons. Your crew can’t safely assemble frame components on slippery surfaces or during storms. Wind speeds that wouldn’t typically stop summer installation become dangerous when combined with snow and reduced visibility.

    Ground frost prevents proper excavation and compaction for foundations. You’ll need specialized equipment and techniques that increase costs considerably. Equipment failures also spike in cold weather, causing unexpected delays.

    Plan your installation for spring through early fall to avoid these costly winter complications that extend timelines.