Author: Robert

  • Lacrosse Training Dome Guide

    Lacrosse Training Dome Guide

    You’re considering a lacrosse training dome, but the decisions ahead aren’t simple. From choosing between an 80′ x 90′ training space versus a full-field setup to steering through the $80,000-$180,000 cost range, each choice impacts your program’s success for years to come. The wrong dome size could limit your training potential, while overlooking key features might leave you frustrated when winter hits. Here’s what separates smart investments from costly mistakes.

    Which Lacrosse Dome Size Fits Your Program?

    When selecting a lacrosse dome, you’ll need to match the dimensions to your program’s specific requirements and available space.

    A full-field lacrosse air dome measures 60′ x 110′ for youth programs, expanding to 110′ x 60′ for men’s competition. These indoor lacrosse facility dimensions require a minimum 35-foot height clearance and accommodate portable goals on turf surfaces.

    If you’re operating a training-focused program, consider a 3/4 field lacrosse training dome at 80′ x 90′. This size works well for skill development and drills while reducing construction costs.

    Don’t forget essential features like a dedicated wall ball area measuring 20′ x 40′ for individual practice sessions.

    Your choice depends on your program’s level, budget constraints, and whether you prioritize full-game scrimmages or intensive skill training sessions.

    Full Field vs Training Dome: Making the Right Choice

    Your decision between a full field and training dome will shape your program’s capabilities for years to come.

    A full field lacrosse bubble accommodates complete game scenarios, scrimmages, and tournaments, making it ideal for established programs with diverse needs.

    Training domes excel at skill development, drills, and year-round practice sessions while requiring less space and investment.

    Consider these scenarios when choosing your lacrosse bubble:

    • Youth programs hosting weekend tournaments with multiple teams rotating through games
    • High school teams running full scrimmages against visiting opponents during winter months
    • Club organizations focusing on individual skill development and wall ball practice
    • Multi-sport facilities maximizing training efficiency with compact, versatile spaces

    Your program’s primary goals, available space, and budget constraints will ultimately determine which option delivers the best long-term value.

    Must-Have Lacrosse Dome Features for Year-Round Play

    Since lacrosse training demands consistent conditions regardless of weather, your dome’s features directly impact player development and safety throughout the year.

    You’ll need a minimum 35-foot height clearance to accommodate high passes and shots without interference. Quality turf surfacing provides consistent ball bounce and reduces injury risk compared to temporary solutions.

    Portable goals offer flexibility for various drills and field configurations, while a dedicated 20′ x 40′ wall ball area lets players practice individual skills simultaneously with team training.

    Proper ventilation systems maintain air quality during intense sessions, and adequate lighting guarantees visibility for evening practices.

    Temperature control keeps conditions comfortable year-round, preventing equipment issues and player fatigue.

    Energy-efficient insulation reduces operational costs while maintaining consistent internal climate for peak training environments.

    Lacrosse Dome Costs: What You’ll Actually Pay

    Three primary factors determine your lacrosse dome investment: size, features, and installation complexity.

    You’ll spend $150,000-$300,000 for a full-field dome, while training domes cost $80,000-$180,000. These prices include basic turf, lighting, and entry systems.

    Your biggest cost variables include:

    • Foundation requirements – Concrete pads, drainage systems, and soil preparation can add $30,000-$60,000.
    • Climate control systems – Heating and ventilation boost costs by $25,000-$50,000 depending on your region.
    • Premium turf upgrades – High-performance surfaces increase expenses by $15,000-$40,000 over standard options.
    • Electrical infrastructure – LED lighting systems and power distribution typically run $20,000-$35,000.

    Remember that installation, permits, and site preparation often add 25-40% to your base dome price.

    Budget accordingly for these essential but overlooked expenses.

    Installing Your Lacrosse Dome: Timeline and Process

    Installing a lacrosse dome typically takes 4-8 weeks from groundbreaking to first practice, but proper planning starts months earlier.

    You’ll need to secure permits, finalize site surveys, and coordinate utilities before construction begins.

    Week one involves site preparation and foundation work for your anchor points. The concrete must cure properly before proceeding.

    Week two covers installing the dome structure itself – this happens quickly once the foundation’s ready. You’ll see your 110′ x 60′ field take shape rapidly.

    Weeks three through four focus on interior work: turf installation, goal setup, and creating your 20′ x 40′ wall ball area.

    Electrical systems, lighting, and HVAC integration occur simultaneously.

    Final weeks include testing all systems, safety inspections, and addressing any punch-list items before you’re cleared for play.

  • Track and Field Indoor Air Dome

    Track and Field Indoor Air Dome

    You’re facing a familiar challenge if you manage athletic programs or coach track and field athletes. Weather disruptions, seasonal limitations, and expensive facility rentals constantly interfere with training schedules and competitive preparation. Traditional indoor tracks require massive investments and sprawling real estate, putting them out of reach for many organizations. There’s an innovative solution that’s changing how athletic facilities operate, offering year-round training capabilities at a fraction of the cost you’d expect.

    What Is a Track and Field Indoor Air Dome?

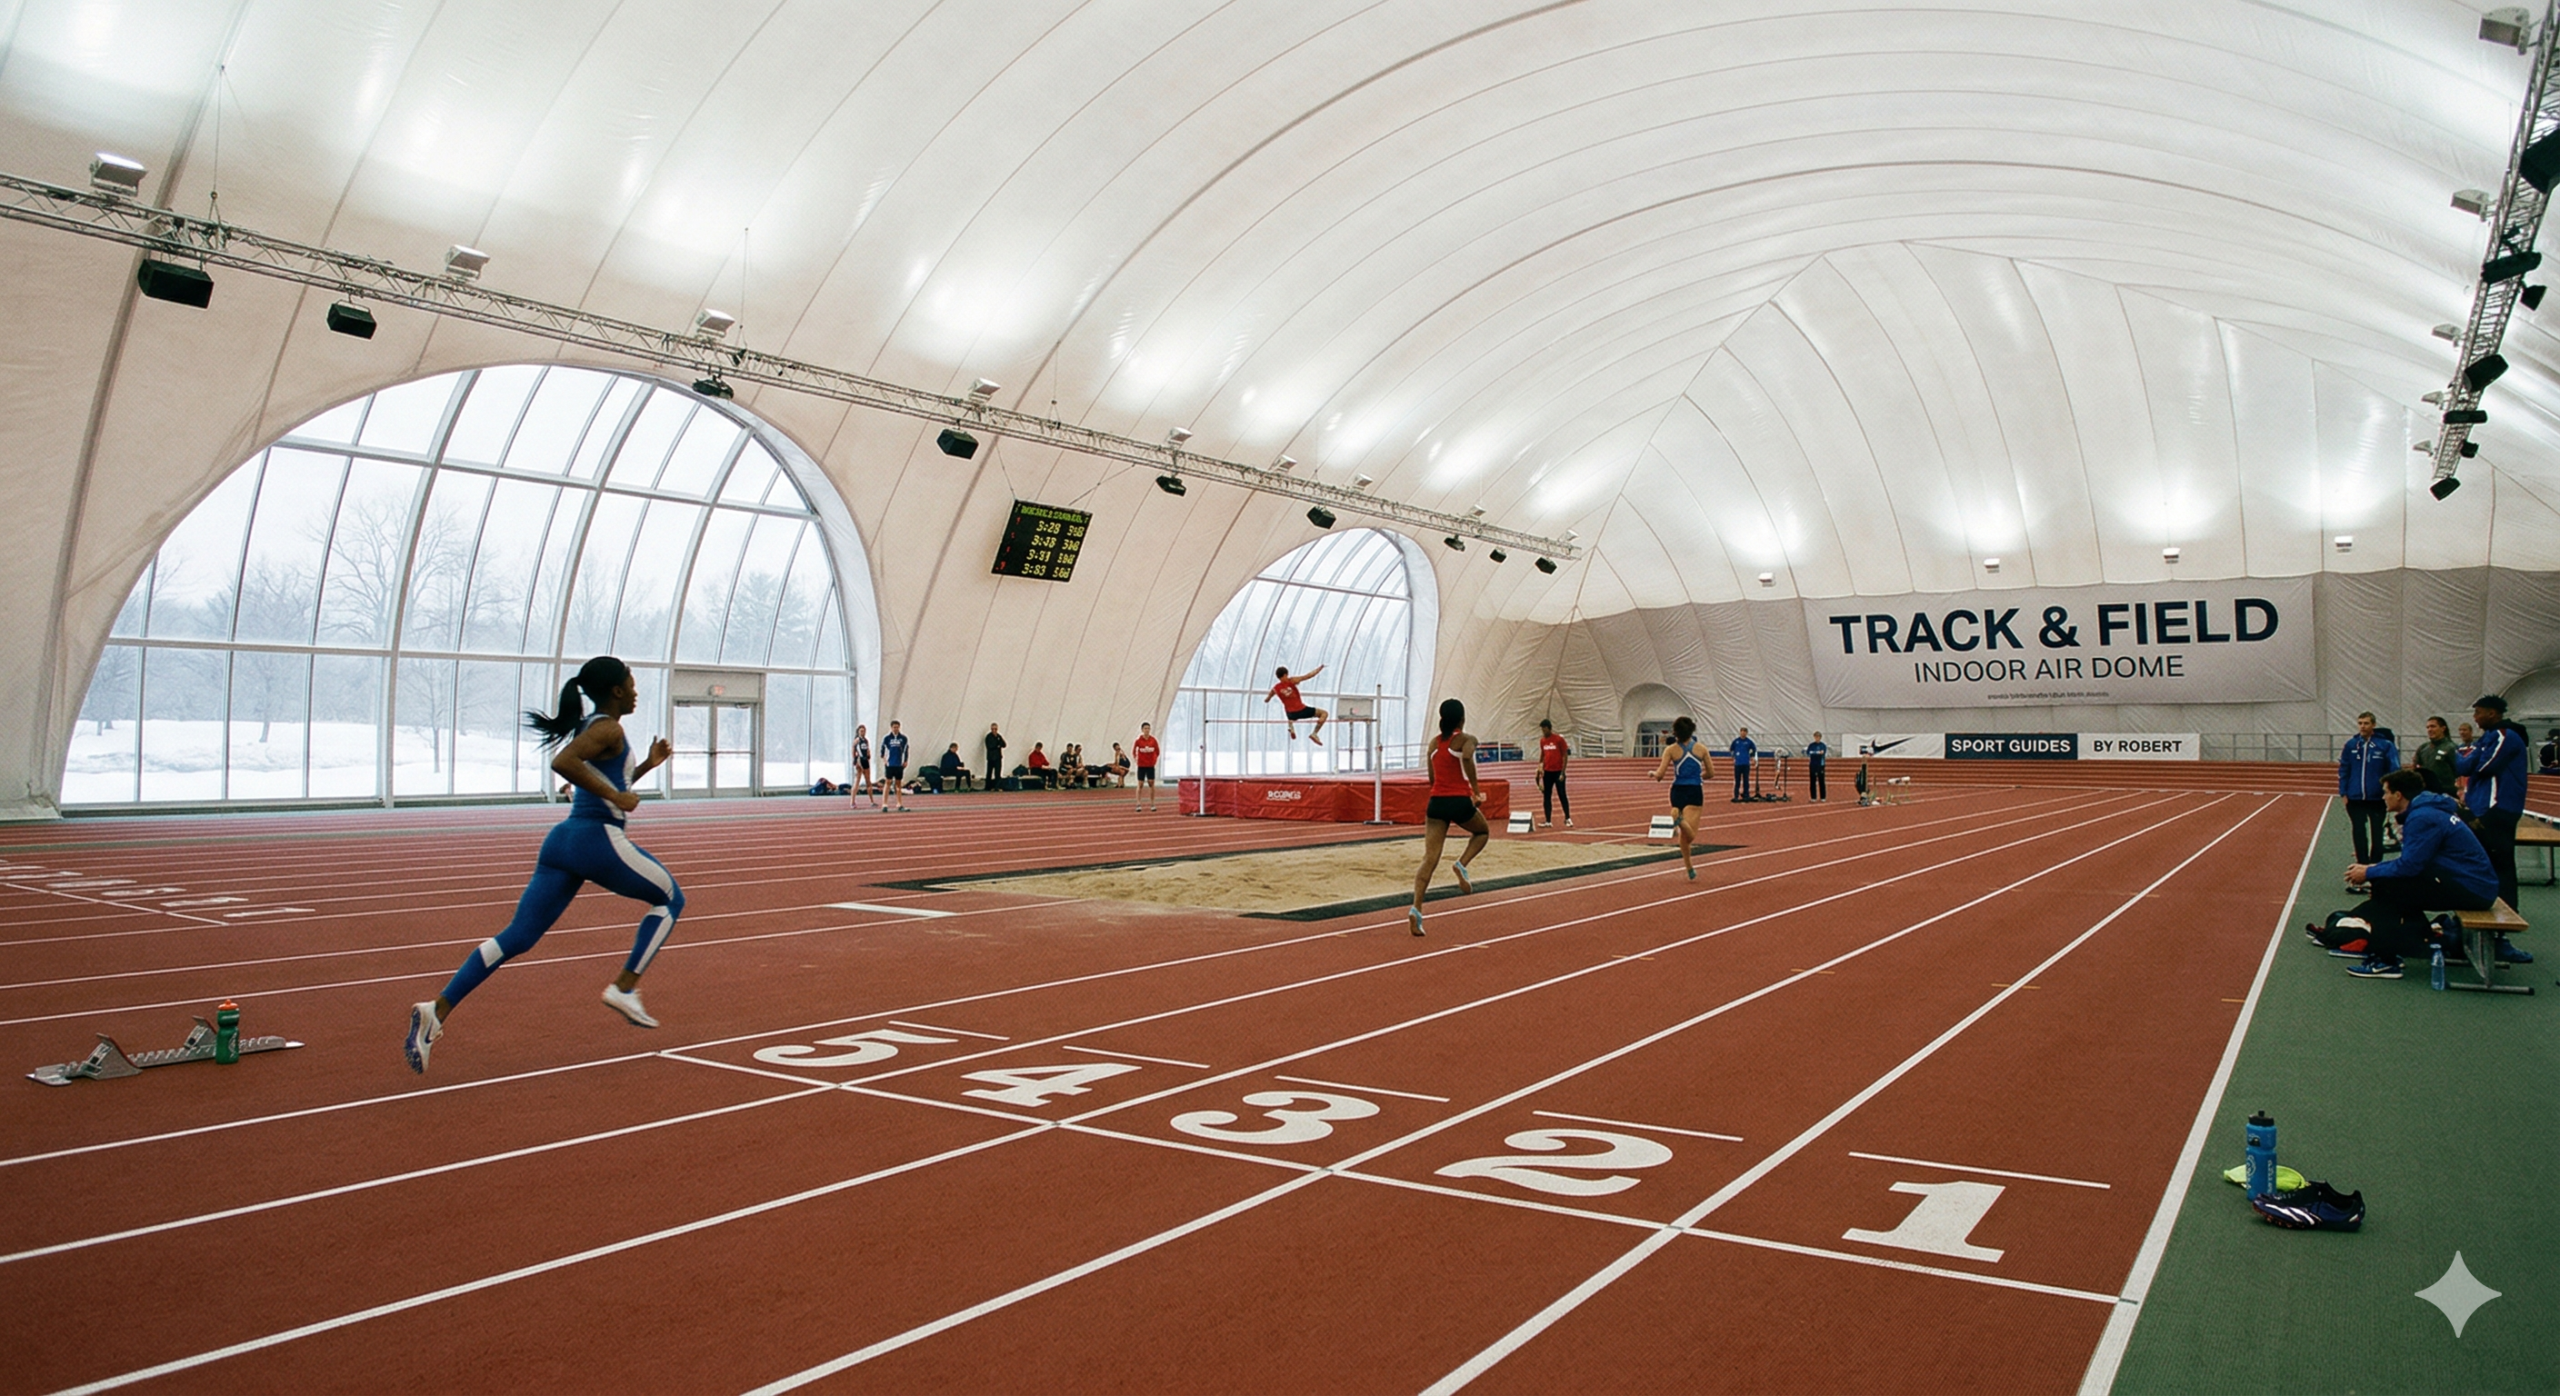
    A track and field indoor track air dome transforms year-round athletic training by housing a complete track facility within an inflatable structure.

    You’ll find these pressurized buildings contain regulation running surfaces, field event areas, and climate-controlled environments that eliminate weather dependencies.

    Your indoor track facility typically features a 200-meter hydraulic-banked track with rubberized surfacing, requiring minimum dimensions of 160′ x 260′.

    The running track dome maintains 40+ foot heights with professional lighting exceeding 50 foot candles.

    Central field areas accommodate long jump pits and shot put circles.

    These structures let you train consistently regardless of snow, rain, or extreme temperatures.

    The indoor track air dome’s pressurized design creates a stable environment while keeping operational costs lower than traditional brick-and-mortar facilities, making elite training accessible year-round.

    Indoor Air Dome Space Requirements and Track Dimensions

    Planning your indoor track air dome starts with understanding the specific spatial requirements that determine your facility’s functionality.

    Your track and field dome dimensions directly impact athlete performance and safety standards.

    For a standard 200-meter hydraulic-banked track, you’ll need minimum dimensions of 160′ x 260′ (48.8m x 79.2m).

    If you’re considering a 300-meter track, expand your requirements to 200′ x 350′ (61m x 106.7m).

    Essential specifications include:

    • Height clearance: 40+ feet (12.2m+) for proper ventilation and safety
    • Central field area: Dedicated space for long jump and shot put events
    • Surface material: Professional rubberized track surface for peak traction
    • Lighting standards: Minimum 50 foot candles for competition-grade visibility

    These measurements guarantee your facility meets regulatory standards while maximizing athletic potential.

    Track Banking, Surface Materials, and Field Configurations

    Precision engineering transforms your indoor track dome from basic infrastructure into a high-performance athletic facility.

    Your 200-meter track requires hydraulic banking systems that automatically adjust curve angles, enhancing runner safety and performance across different events. The rubberized surface material you’ll install must provide consistent traction while reducing impact stress on athletes’ joints.

    You’ll configure the central field area to accommodate multiple events simultaneously. Long jump runways typically extend from the track’s interior, while shot put circles position strategically to maximize safety clearances.

    Your dome’s 40-foot minimum height guarantees adequate space for pole vault and high jump events.

    Surface consistency becomes critical—temperature fluctuations can affect rubber track performance, so you’ll need climate control systems maintaining ideal conditions year-round for competitive standards.

    Indoor Air Dome Lighting and Environmental Control

    You’ll need proper lighting that delivers at least 50 foot candles of illumination to guarantee athletes can perform safely and effectively during training and competition.

    Your climate control system must maintain consistent temperature and humidity levels while managing air circulation throughout the dome structure.

    These environmental factors directly impact athletic performance and the longevity of your track surface materials.

    Optimal Lighting Standards

    When athletes train year-round in your indoor air dome, consistent lighting becomes essential for both performance and safety.

    You’ll need a minimum of 50 foot candles of illumination across your track surface to guarantee athletes can clearly see lane markings, obstacles, and their footing during high-intensity training sessions.

    Your lighting system should deliver:

    • Uniform distribution – No dark spots or glare zones that could cause missteps
    • High-quality LED fixtures – Energy-efficient with minimal heat generation
    • Consistent color temperature – 4000K-5000K range for natural daylight simulation
    • Emergency backup systems – Battery-powered lighting for safe evacuation

    You’ll want to position fixtures strategically around the dome’s perimeter and overhead to eliminate shadows.

    Proper lighting isn’t just about visibility—it affects athlete circadian rhythms and training quality throughout winter months.

    Climate Control Systems

    Beyond maintaining proper visibility, your indoor air dome requires sophisticated climate control to create excellent training conditions year-round. You’ll need systems that regulate temperature, humidity, and air circulation to enhance athletic performance and prevent condensation damage.

    System Component Recommended Range Key Benefits
    Temperature 60-68°F (15-20°C) Superior performance comfort
    Humidity 40-60% RH Prevents condensation/mold
    Air Changes 6-8 per hour Fresh air circulation
    Pressure +0.2-0.5″ WC Maintains dome structure
    Filtration MERV 8-13 Removes dust/allergens

    Your HVAC system must maintain positive air pressure to keep the dome inflated while providing adequate ventilation. Installing zone controls allows you to adjust conditions based on occupancy and activity levels, ensuring energy efficiency without compromising athlete comfort.

    Indoor Air Dome vs Traditional Indoor Track Facilities

    When you’re deciding between an air dome and traditional indoor track facility, you’ll need to weigh three critical factors that’ll impact your project’s success.

    Cost differences can be substantial, with air domes typically requiring lower upfront investment but ongoing operational expenses for inflation systems.

    You’ll also face different space requirements and construction timelines that could greatly affect your facility’s feasibility and opening date.

    Cost Comparison Analysis

    Five critical cost factors separate indoor air dome track facilities from traditional brick-and-mortar indoor tracks, with initial construction expenses showing the most striking difference.

    You’ll find air domes cost 60-80% less than traditional facilities. A 200m track air dome typically runs $300,000-$500,000, while conventional indoor tracks demand $2-5 million.

    Here’s what drives these savings:

    • Foundation requirements: Air domes need minimal concrete work versus extensive structural foundations.
    • Material costs: Fabric membrane systems cost considerably less than steel, brick, and extensive HVAC systems.
    • Construction timeline: 8-12 weeks for air domes compared to 12-24 months for traditional facilities.
    • Operating expenses: Lower heating/cooling costs due to efficient air circulation and insulation properties.

    You’ll also save on maintenance, as air dome systems require less structural upkeep than traditional buildings.

    Space Requirements Differences

    While traditional indoor track facilities demand massive footprints with extensive structural zones, air domes maximize usable space within surprisingly compact dimensions.

    You’ll find conventional facilities require additional square footage for structural supports, mechanical rooms, and perimeter walkways that don’t contribute to athletic performance. Air domes eliminate these space-wasting elements.

    For a 200-meter track, you need only 160′ x 260′ of actual ground space with an air dome, while traditional buildings require 30-40% more total area for the same usable track surface.

    The dome’s inflated structure creates clear spans without interior columns, giving you maximum field space for shot put and long jump activities.

    You’re fundamentally getting more athletic functionality per square foot of real estate investment.

    Construction Timeline Factors

    Traditional indoor track construction can stretch 18-24 months from groundbreaking to completion, but air dome installations typically finish in just 8-12 weeks.

    You’ll find this dramatic difference stems from the simplified construction process and reduced structural requirements.

    Your air dome project eliminates several time-consuming phases that traditional facilities require:

    • Foundation work – Simple concrete slab vs. complex structural foundations
    • Structural steel – No steel framework or roof trusses needed
    • Weather delays – Dome inflation protects work from elements
    • Interior finishing – Minimal electrical and mechanical systems

    You won’t face the lengthy permit approval processes that plague traditional construction either.

    The streamlined design means fewer trades, reduced coordination complexity, and faster material delivery.

    Most delays you’ll encounter involve site preparation and utility connections rather than structural complications.

    Indoor Air Dome Installation and Cost Factors

    Because track and field air domes require specialized engineering and materials, you’ll face several key cost factors that directly impact your total investment.

    Foundation work represents your largest expense, requiring specialized footings for hydraulic banking systems and proper drainage.

    The dome fabric itself costs considerably more than standard structures due to its size requirements—160′ x 260′ minimum for 200m tracks.

    Installation complexity increases costs through specialized labor requirements. You’ll need certified technicians for hydraulic banking systems, professional lighting installation achieving 50+ foot candles, and rubberized surface application.

    Air handling systems require industrial-grade blowers and backup power systems to maintain structural integrity.

    Geographic location affects transportation costs for oversized materials, while local building codes may require additional engineering certifications, further impacting your budget.

    Air-Supported Structure Maintenance and Upkeep

    Since your track and field air dome depends on continuous air pressure to maintain structural integrity, you’ll need to establish a thorough maintenance program that addresses both routine upkeep and emergency preparedness.

    Regular maintenance tasks include:

    • Fan system inspection – Check blowers monthly for proper operation, clean filters, and verify backup systems function correctly.
    • Membrane assessment – Examine fabric for tears, wear patterns, and proper tension while monitoring air pressure gauges daily.
    • Anchor point evaluation – Inspect foundation attachments, cable tensioning, and ground seal integrity quarterly.
    • Emergency protocol testing – Practice deflation procedures and staff evacuation plans while maintaining emergency repair kits on-site.

    You’ll also need to schedule professional inspections annually and budget for membrane cleaning every 2-3 years.

    Proper documentation of all maintenance activities helps identify potential issues before they become costly repairs.

    Selecting the Right Indoor Air Dome for Your Needs

    How do you determine which indoor air dome specifications will best serve your track and field program? Start by evaluating your space requirements and budget constraints.

    A standard 200-meter hydraulic-banked track requires a minimum 160′ x 260′ footprint, while a 300-meter track needs 200′ x 350′. Consider your primary activities—if you’ll host long jump and shot put events, guarantee adequate central field area dimensions.

    Height matters for safety and performance; you’ll need 40+ feet minimum clearance.

    Don’t overlook lighting requirements of 50+ foot candles for proper visibility during training and competitions. Your rubberized surface choice affects athlete performance and maintenance costs.

    Factor in local weather conditions, intended usage frequency, and whether you’ll need year-round or seasonal operation when making your final selection.

  • Volleyball Air Dome Planning

    Volleyball Air Dome Planning

    You’re considering a volleyball air dome, but you’ll quickly discover that proper planning separates successful facilities from costly mistakes. The difference between a $200,000 investment and an $800,000 project often comes down to decisions you’ll make in the early stages—decisions about court dimensions, site preparation, and structural requirements that most people don’t anticipate. Before you commit to any contractor or design, there’s critical information you need to understand about what actually drives these costs.

    Volleyball Air Dome Costs and Budget Planning

    Before you break ground on your volleyball air dome project, you’ll need to establish a thorough budget that accounts for both initial construction and ongoing operational expenses.

    Your volleyball air dome costs typically range from $200,000 to $800,000 depending on size, location, and features. A single-court indoor volleyball dome starts around $200,000, while a four-court facility can exceed $600,000.

    Key budget considerations include site preparation, foundation work, structural engineering, HVAC systems, and electrical installations.

    Don’t overlook ongoing expenses like utilities, insurance, and maintenance contracts. Your volleyball facility dome will require continuous air pressure systems, increasing monthly energy costs by $2,000-$5,000.

    Factor in permits, inspections, and professional consultations.

    Smart planning prevents costly overruns and guarantees your project stays financially viable long-term.

    Court Size Requirements and Facility Layout Options

    When planning your volleyball air dome, you’ll need to determine the exact court dimensions and layout configuration that best serves your facility’s purpose.

    Standard volleyball courts measure 30′ x 60′, but you should consider the recommended 40′ x 70′ footprint that includes essential buffer zones for player safety.

    Your layout options range from single-court facilities to multi-court configurations like the popular 4-court setup requiring a 100′ x 150′ building footprint.

    Standard Court Dimensions

    Two primary measurements define volleyball air dome planning: the official court size and the recommended facility dimensions with safety buffers. Your volleyball court cover needs specific dimensional requirements to guarantee proper gameplay and safety.

    The standard court measures 30′ x 60′, but you’ll want additional space around the perimeter. Here’s what you need to know:

    Specification Minimum Recommended
    Court Size 30′ x 60′ 30′ x 60′
    Facility Size 30′ x 60′ 40′ x 70′
    Clear Height 23′ (7m) 30′ (9.1m)
    Buffer Zone None 5′ all sides
    Flooring Type Sport court Wood/sport court

    The recommended 40′ x 70′ facility size provides essential buffer zones for player safety and improved gameplay. You’ll also need minimum 23-foot ceiling clearance, though 30 feet creates ideal playing conditions.

    Multi-Court Layout Planning

    Multi-court volleyball facilities require strategic space planning to maximize player capacity while maintaining safety standards.

    You’ll need to evaluate both individual court requirements and overall facility flow when designing your layout.

    For a standard 4-court configuration, you’re looking at a 100′ x 150′ (30.5m x 45.7m) facility footprint. This accommodates four regulation courts with proper buffer zones between each playing area.

    You can arrange courts in a 2×2 grid pattern or linear formation, depending on your dome’s shape and entry points.

    Remember to include adequate spacing for spectator areas, equipment storage, and player circulation paths.

    Consider installing removable net systems to convert the space for tournaments or alternative sports.

    Your layout should also account for emergency exits and HVAC equipment placement within the dome structure.

    Location Requirements for Volleyball Dome Installation

    You’ll need adequate space beyond the dome footprint itself, typically requiring 20-30% additional area for equipment access and emergency exits.

    Your site must provide level ground or budget for grading, proper drainage, and stable soil conditions that can support the dome’s anchor system.

    Before installation, you’re required to obtain building permits and verify your location complies with local zoning regulations for recreational structures.

    Site Size Considerations

    When selecting a site for your volleyball air dome, the foundation dimensions will dictate your minimum land requirements.

    You’ll need to account for the actual court space plus additional clearance for safety and maintenance access around the structure’s perimeter.

    For a single-court facility, plan for approximately 40′ x 70′ (12.2m x 21.3m) to accommodate the court and buffer zones.

    However, your total site requirements extend beyond just the dome footprint:

    • Parking and access roads – Allow space for player, spectator, and maintenance vehicle parking
    • Utility connections – Reserve areas for electrical service, water lines, and drainage systems
    • Emergency access – Maintain clear pathways for fire department vehicles and emergency evacuation

    A four-court layout requires roughly 100′ x 150′ (30.5m x 45.7m) for the structure alone.

    Ground Preparation Requirements

    Once you’ve determined your site dimensions, proper ground preparation becomes your next priority for successful dome installation. You’ll need a level surface with minimal slope – ideally less than 1% grade across the entire footprint.

    Remove all vegetation, rocks, and debris from the area, then compact the soil to prevent settling that could damage your dome’s foundation system.

    Consider drainage carefully since water pooling around your dome creates serious problems. Install proper drainage systems or select naturally well-draining locations. The ground surface should be smooth and free of sharp objects that might puncture the dome’s base fabric.

    For permanent installations, you’ll want a concrete perimeter foundation or ground anchoring system.

    Temporary setups can use specialized ground anchors, but soil conditions must support the required holding strength against wind loads and internal air pressure.

    Zoning and Permits

    Before breaking ground on your volleyball dome project, understanding local zoning laws and permit requirements will save you from costly delays and legal complications.

    Most municipalities classify air domes as temporary or permanent structures, which affects your permit pathway.

    You’ll need to research several key areas before moving forward:

    • Zoning compliance – Verify your property allows recreational structures and meets setback requirements from property lines.
    • Building permits – Submit structural plans showing your dome’s foundation, anchoring system, and compliance with local building codes.
    • Special use permits – Some areas require additional permits for commercial sports facilities or structures exceeding height restrictions.

    Contact your local building department early in the planning process. They’ll provide specific requirements for your area and help you navigate the approval timeline efficiently.

    Volleyball Air Dome Structure and Height Needs

    Since volleyball requires significant vertical clearance for serves and spikes, you’ll need to plan for substantial height requirements when designing your air dome. The minimum clear height is 23 feet, but you should target 30 feet for ideal play conditions. This extra height prevents interference with high serves and aggressive spikes while ensuring proper ball trajectory.

    Your court dimensions need careful consideration too. While official courts measure 30′ x 60′, you’ll want 40′ x 70′ including safety buffers around the perimeter. This prevents players from colliding with walls during aggressive plays.

    For flooring, choose wood or specialized sport court surfaces that provide proper traction and shock absorption.

    If you’re planning a multi-court facility, a 100′ x 150′ structure accommodates four courts with adequate spacing between them.

    Flooring and Climate Control System Essentials

    While structural elements form your dome’s foundation, the flooring and climate control systems directly impact player performance and comfort.

    You’ll need specialized flooring that provides proper shock absorption and traction for volleyball’s dynamic movements. Wood flooring offers excellent performance characteristics, while synthetic sport court surfaces provide durability and consistent ball bounce.

    Your climate control system must maintain ideal playing conditions year-round.

    Consider these essential features:

    • Temperature regulation – Maintain 65-75°F (18-24°C) for player comfort during intense matches
    • Humidity control – Keep levels between 40-60% to prevent condensation and guarantee proper ball handling
    • Air circulation – Provide adequate ventilation to prevent stagnant air pockets and maintain consistent airflow

    Proper integration of these systems guarantees your volleyball dome delivers professional-quality playing conditions that enhance performance while protecting your investment through reduced maintenance needs.

    Installation Timeline and Project Management Steps

    Once you’ve finalized your flooring and climate systems, you’ll need to establish a clear installation timeline that coordinates multiple trades and minimizes weather delays.

    Start by securing permits and scheduling site preparation 4-6 weeks before your target completion date. Foundation work typically requires 1-2 weeks, followed by electrical and mechanical rough-ins.

    Plan for dome installation during favorable weather conditions, as wind speeds above 15 mph can halt progress. The actual dome erection takes 2-3 days with proper crew coordination.

    Interior work follows a specific sequence: flooring installation, net systems, lighting, and final HVAC commissioning.

    Create buffer time for inspections and potential delays.

    Assign a dedicated project manager to coordinate between contractors, handle permit approvals, and maintain communication with all stakeholders throughout the process.

  • Multi-Sport Air Dome Design

    Multi-Sport Air Dome Design

    You’re considering a multi-sport air dome, but you’re probably wondering how to maximize every square foot while keeping costs reasonable. The challenge isn’t just fitting multiple sports into one space—it’s creating seamless shifts between activities without compromising play quality or safety. From net systems that disappear in minutes to line markings that won’t confuse your players, there’s a specific strategy that separates profitable facilities from costly mistakes.

    What Sports Can You Play In A 100′ X 200′ Multi-Sport Air Dome?

    When you’re investing in a 100′ x 200′ multi-sport air dome, you’ll have the flexibility to accommodate multiple court configurations within the 20,000 square feet of playing space.

    Your versatile sports dome can house two full-sized tennis courts or two basketball courts for larger sports requiring more room. If you’re focusing on volleyball, you can fit four courts comfortably, making it perfect for tournaments or league play.

    For pickleball enthusiasts, your combined sports dome maximizes capacity with eight courts, creating an excellent revenue opportunity.

    The removable net systems, ranging from $5,000 to $12,000, allow you to quickly switch between sports. Multi-purpose line markings eliminate confusion during changeovers, while integrated equipment storage keeps your facility organized and professional-looking year-round.

    Multi-Sport Air Dome Space Planning: Maximizing Your Court Options

    Since your 20,000-square-foot air dome offers multiple court configurations, strategic space planning becomes essential for maximizing both functionality and revenue potential.

    You’ll need to evaluate peak usage times for different sports when designing your multi-purpose indoor facility layout. Install removable net systems ranging from $5K-$12K to enable quick shifts between tennis, basketball, volleyball, and pickleball courts.

    Multi-purpose line markings painted on your flooring eliminate the need for constant remarking.

    Position equipment storage strategically around the perimeter to maintain clear sightlines and safety zones. Think about installing retractable divider curtains to create separate playing areas simultaneously.

    You can generate more revenue by accommodating different sports during busy periods, transforming your single dome into multiple revenue streams through intelligent space allocation.

    Removable Net Systems And Equipment Storage For Multi-Sport Air Domes

    Although your air dome’s versatility depends on quick sport changes, you’ll find that investing in quality removable net systems makes all the difference in operational efficiency.

    Professional-grade removable nets typically cost between $5,000-$12,000 but deliver rapid court conversions that maximize your facility’s revenue potential.

    You’ll want systems featuring wheeled bases, telescoping posts, and quick-release mechanisms that allow staff to reconfigure courts in minutes rather than hours. Tennis nets can transform into volleyball setups, while basketball hoops retract for floor sports.

    Strategic equipment storage becomes equally critical. Install wall-mounted racks, rolling carts, and designated zones for nets, posts, and sport-specific gear.

    Proper organization guarantees smooth shifts between tennis, basketball, volleyball, and pickleball configurations while keeping your dome clutter-free and professionally maintained.

    Multi-Purpose Line Marking: One Surface, Multiple Sports

    While removable nets handle the vertical elements of sport conversion, your flooring strategy determines how seamlessly athletes shift between different games on the same surface.

    Multi-purpose line markings transform your 20,000 square foot air dome into a versatile athletic facility that maximizes every inch of space.

    Your line marking system should accommodate multiple sports simultaneously:

    1. Color-coded lines – Tennis uses white, basketball employs contrasting colors, volleyball utilizes bright tape, and pickleball requires distinct boundary markers.
    2. Permanent court overlays – Heat-sealed thermoplastic lines withstand heavy traffic and weather changes.
    3. Removable tape systems – Temporary markings for seasonal sports or special events.
    4. Strategic layout planning – Position courts to minimize line confusion and optimize player safety during simultaneous games.

    This approach maximizes your dome’s revenue potential year-round.

    Air Dome Structure: What Your Multi-Sport Facility Really Needs

    Multi-purpose line markings work only when your air dome structure can handle the demands of different sports happening simultaneously.

    You’ll need a central space measuring 100′ x 200′ (30.5m x 61m) to accommodate multiple court configurations effectively. This 20,000 square foot area supports two tennis courts, two basketball courts, four volleyball courts, or eight pickleball courts within a single dome structure.

    Your facility requires adequate ceiling height for volleyball spikes and tennis serves, while maintaining structural integrity under varying air pressures.

    Consider reinforced anchor points for removable net systems, which cost $5K-$12K but provide essential flexibility.

    Don’t overlook equipment storage integration – built-in storage areas keep your facility organized when shifting between sports.

    The dome’s engineering must accommodate simultaneous activities without compromising safety or performance standards.

    Multi-Sport Air Dome Cost Breakdown: From $5K Nets To Total Investment

    Three major cost categories will determine your total multi-sport air dome investment: equipment systems, structural components, and ongoing operational expenses.

    Your removable net systems represent a significant portion of equipment costs, ranging from $5,000 to $12,000 depending on quality and versatility. These systems enable quick court conversions between tennis, basketball, volleyball, and pickleball configurations.

    Key cost components include:

    1. Net Systems & Court Equipment – $5K-$12K for removable systems plus storage solutions
    2. Multi-Purpose Line Markings – Custom court layouts for all sports applications
    3. Air Dome Structure – Foundation, membrane, and anchoring systems for your facility
    4. HVAC & Pressurization – Climate control and air pressure maintenance equipment

    You’ll also need to budget for permits, installation labor, and monthly utility costs.

    Equipment storage solutions add convenience but increase your initial investment.

  • Football Practice Facility Air Dome

    Football Practice Facility Air Dome

    You’re looking at months of cancelled practices and frustrated players when harsh weather hits your football program. An air dome facility could transform your training schedule, but you’ll need to understand the significant differences between full and partial field options, height requirements that affect play quality, and installation costs that vary dramatically by location. The decision you make now will determine whether your team maintains competitive edge year-round or continues losing valuable practice time.

    What Are Football Practice Air Domes And Their Key Benefits?

    Football practice air domes are large, inflatable structures that provide teams with dedicated indoor training space regardless of weather conditions.

    You’ll find these football practice domes offer year-round accessibility, protecting your team from rain, snow, wind, and extreme temperatures that typically disrupt outdoor sessions.

    Your indoor football facility maintains consistent playing conditions, allowing uninterrupted skill development and strategic preparation.

    The controlled environment eliminates weather-related cancellations, maximizing practice time during vital training periods.

    You’ll benefit from extended seasons, particularly in regions with harsh winters or unpredictable weather patterns.

    These football training domes accommodate full-field dimensions with sufficient height for punting and kicking drills.

    You can customize the space with portable goal posts and essential turf surfaces, creating an authentic playing environment that enhances player performance and maintains competitive readiness throughout the season.

    Football Air Dome Size Guide: Full Field Vs Partial Field Dimensions

    When selecting your football air dome dimensions, you’ll choose between full field specifications at 160′ x 360′ (48.8m x 110m) or partial field options like the 120′ x 270′ (36.6m x 82.3m) configuration that works well for high schools.

    Full field dimensions accommodate complete game simulations and allow teams to practice all formations without space constraints. You’ll need 60’+ (18.3m+) ceiling height for punts and kicks, with optional end zones depending on your budget and available land.

    The 3/4 field football air dome offers significant cost savings while maintaining essential practice capabilities. This smaller configuration works perfectly for skill development, scrimmages, and conditioning.

    High schools find this size ideal because it provides adequate space for most drills while reducing construction and operational expenses substantially.

    Height And Surface Requirements For Football Air Dome Performance

    Beyond selecting the right footprint for your air dome, you’ll need to focus on two performance factors that directly impact practice quality: ceiling height and surface materials.

    Your dome’s height determines what football activities you can accommodate. You’ll need a minimum of 60 feet (18.3m) to handle punts and field goal practice effectively.

    Anything lower restricts your training options and forces players to adjust their natural kicking trajectories.

    The surface choice is equally critical. Turf isn’t optional—it’s essential for proper football practice.

    Natural grass won’t survive the controlled indoor environment, while concrete or hard surfaces create injury risks.

    Quality synthetic turf provides consistent footing, proper ball bounce, and the realistic playing conditions your team needs for effective skill development and conditioning.

    Football Air Dome Costs: Price Factors And Budget Breakdown

    Since your air dome’s functionality depends heavily on proper specifications, understanding the associated costs becomes your next priority. Several key factors directly impact your total investment, from size requirements to surface preparation needs.

    Your dome’s dimensions represent the largest cost variable. Full-field installations require considerably more materials and engineering than three-quarter field options. Foundation preparation, electrical systems, and HVAC equipment add substantial expenses beyond the dome structure itself.

    Cost Component Price Range
    Full Field Dome (160′ x 360′) $800K – $1.2M
    3/4 Field Dome (120′ x 270′) $500K – $750K
    Installation & Site Prep $150K – $300K

    You’ll also need to budget for ongoing operational costs including utilities, maintenance, and insurance. These annual expenses typically range from $50,000 to $100,000 depending on your dome’s size and local utility rates.

    Football Air Dome Installation: Process, Timeline, And Requirements

    Installation complexity makes football air dome projects demanding undertakings that require careful coordination between multiple specialists.

    You’ll need to navigate foundation preparation, utility connections, and structural assembly while managing weather dependencies and regulatory approvals.

    The installation process typically follows these key phases:

    1. Site Preparation (2-4 weeks) – Foundation excavation, utility trenching, and concrete pad installation requiring proper drainage and electrical infrastructure.
    2. Dome Assembly (1-2 weeks) – Membrane attachment, blower system installation, and pressurization testing with specialized crews and equipment.
    3. Interior Finishing (1-3 weeks) – Turf installation, goal post setup, lighting connections, and HVAC system commissioning.

    You should expect a 6-10 weeks total timeline, depending on your facility size and local permitting requirements.

    Weather delays can extend schedules considerably during winter months.

  • Indoor Soccer Complex Air Dome

    Indoor Soccer Complex Air Dome

    You’ve likely seen those gleaming traditional soccer facilities and wondered if there’s a smarter way to enter the indoor sports market. Air dome technology has quietly revolutionized how entrepreneurs approach soccer complex development, offering construction timelines that’ll surprise you and operating margins that traditional buildings simply can’t match. While your competitors sink hundreds of thousands into conventional structures, you’re about to discover why the most successful indoor soccer businesses are choosing an entirely different path.

    Why Indoor Soccer Air Domes Beat Traditional Buildings

    When you’re planning an indoor soccer complex, air domes offer compelling advantages over traditional brick-and-mortar buildings. Your indoor soccer complex dome costs considerably less to construct—typically 60-70% cheaper than conventional structures.

    You’ll also save on heating and cooling since the pressurized air system provides natural insulation.

    A soccer facility air dome goes up faster, often within weeks rather than months or years for traditional construction. You won’t need expensive steel frameworks or foundations, reducing both material costs and construction time.

    Your soccer training center dome offers flexibility too—you can relocate it if needed, unlike permanent buildings.

    The wide-open interior space maximizes your playing area without support columns interfering with gameplay.

    Plus, you’ll benefit from excellent acoustics and natural lighting options that enhance the player experience.

    Indoor Soccer Air Dome Construction Costs vs Brick-and-Mortar

    The numbers tell a clear story when comparing air dome versus traditional construction costs for your indoor soccer complex. You’ll save 40-60% on initial construction with a commercial soccer dome compared to brick-and-mortar facilities.

    Cost Component Air Dome Traditional Building
    Construction per sq ft $15-25 $80-120
    Foundation requirements Minimal concrete pad Full foundation/footings
    Timeline to completion 8-12 weeks 12-18 months
    Total project cost $400K-800K $1.2M-2.5M

    Your commercial soccer dome eliminates expensive structural steel, extensive HVAC systems, and complex roofing. You’ll also reduce permitting complexity and labor costs considerably. The air-supported structure requires only basic utilities and a simple concrete slab, making it ideal for entrepreneurs seeking faster ROI on their indoor soccer investment.

    Sizing Your Indoor Soccer Air Dome for Maximum Revenue

    When sizing your indoor soccer air dome, you’ll need to choose between fewer large fields or more smaller fields to maximize your revenue potential.

    Your field configuration directly impacts how many games you can host simultaneously and your overall revenue per square foot.

    The key is finding the sweet spot between field size, spectator capacity, and operational efficiency that generates the highest annual income.

    Field Configuration Options

    Since maximizing your facility’s earning potential depends heavily on field layout choices, you’ll need to weigh the trade-offs between fewer large fields versus more compact playing surfaces.

    You can configure your air dome with 2-3 full-sized fields measuring 240′ x 360′ (73m x 110m) each, which attract competitive leagues and tournaments but limit scheduling flexibility.

    Alternatively, install 4-6 smaller fields at 150′ x 225′ (45.7m x 68.6m) to accommodate more simultaneous games and diverse age groups.

    Smaller fields generate higher hourly rates through increased booking capacity, while full-sized fields command premium pricing for adult leagues.

    Consider your target market carefully—youth programs thrive on compact fields, whereas serious adult players demand regulation dimensions.

    Your configuration choice directly impacts that $300K-$800K annual revenue potential.

    Revenue Per Square Foot

    Calculate your facility’s revenue per square foot to determine the ideal air dome size for your investment.

    With commercial indoor soccer complexes generating $300K-$800K annually, you’ll want to maximize your space efficiency. A 2-3 full field configuration requires approximately 86,400-129,600 square feet, yielding $2.31-$9.26 per square foot.

    Smaller 4-6 field layouts need 41,400-62,100 square feet, generating $4.83-$19.32 per square foot.

    Don’t forget auxiliary spaces that boost revenue. Spectator bleachers accommodating 200-400 people create additional income through admissions and events. Your 400-square-foot concession area generates high-margin food and beverage sales.

    Factor in locker rooms, party rooms, and retail space when calculating total square footage. Higher occupancy rates and premium pricing for peak hours will drive your per-square-foot returns upward.

    Climate Control Systems That Keep Players Comfortable

    You’ll need robust temperature regulation technology to maintain consistent 65-70°F conditions year-round, ensuring players perform at their peak regardless of outside weather.

    Your HVAC system must handle the heat load from 20-40 active players while preventing condensation buildup on your dome structure.

    Strategic air circulation optimization creates even temperature distribution and eliminates hot spots that could affect game quality and player comfort.

    Temperature Regulation Technology

    When players sprint across your indoor soccer fields for hours each day, maintaining ideal temperature becomes critical for both performance and safety.

    You’ll need advanced HVAC systems that can handle the massive heat loads generated by 20-40 active players simultaneously.

    Smart thermostats with zone control let you adjust temperatures across different field areas independently. Variable refrigerant flow systems provide precise cooling while reducing energy costs by up to 30%.

    Heat recovery ventilators capture warm exhaust air to preheat incoming fresh air, maximizing efficiency.

    Your system should maintain 65-68°F during active play, with humidity levels between 40-60%.

    Install radiant heating panels for quick warm-up during cold months. Backup systems guarantee continuous operation during peak revenue hours, protecting your $300K-$800K annual income stream.

    Air Circulation Optimization

    Since stagnant air creates hot spots and reduces player performance, your indoor soccer complex requires strategic air circulation that moves fresh oxygen throughout every corner of your facility.

    You’ll need industrial-grade fans positioned at key intervals to create continuous airflow patterns across your 240′ x 360′ fields.

    Install ceiling-mounted circulation fans that operate at variable speeds, allowing you to adjust intensity based on occupancy and activity levels.

    Position intake vents near the ground and exhaust vents at ceiling height to establish natural convection currents. This creates a循環 system that pulls cooler air down while pushing warm, humid air upward and out.

    You’ll want to maintain 6-8 air changes per hour during peak usage.

    Strategic placement prevents dead air zones in corners and guarantees spectators in your 200-400 capacity bleachers stay comfortable throughout matches.

    Indoor Soccer Business Models That Generate $300K-$800K

    The most profitable indoor soccer complexes combine multiple revenue streams that capitalize on their field space throughout the day and week.

    You’ll maximize earnings by running youth leagues during evenings, adult leagues at night, and hosting birthday parties on weekends. Corporate team-building events and summer camps fill daytime slots when schools are in session.

    Your facility layout directly impacts profitability. Installing 2-3 full fields generates higher revenue per square foot than 4-6 smaller fields, but smaller fields offer scheduling flexibility for different age groups.

    You’ll need 200-400 seat bleachers for tournaments and championship games, which command premium pricing.

    Don’t overlook your 400-square-foot concession area—it’s pure profit margin. Tournaments and league nights drive food and beverage sales that can represent 15-20% of total revenue.

    Operating Costs and Maintenance for Soccer Air Domes

    Although air dome technology reduces construction costs, your ongoing operational expenses will greatly impact profitability.

    Electricity costs for continuous air blowers range $800-$1,500 monthly, depending on dome size and local utility rates. You’ll need backup generators costing $15,000-$30,000 to prevent collapse during power outages.

    Annual membrane maintenance includes cleaning, patching tears, and inspecting anchor systems, typically costing $5,000-$12,000.

    Expect membrane replacement every 15-20 years at $80,000-$150,000 per field. Snow removal equipment is essential in cold climates to prevent excessive weight loads.

    HVAC systems maintain comfortable temperatures year-round, adding $300-$800 monthly.

    Professional inspections guarantee structural integrity and insurance compliance.

    Budget 8-12% of gross revenue for total facility maintenance, including lighting, flooring repairs, and safety equipment updates to maintain peak playing conditions.

  • Year-Round Tennis With Air Domes

    Year-Round Tennis With Air Domes

    You’ve probably watched your tennis facility’s revenue plummet during winter months, forcing you to close courts and cancel programs when weather turns harsh. Tennis air domes offer a game-changing solution that can extend your playing season by 6-8 months while generating an additional $120K to $250K per court annually. But here’s what most facility owners don’t realize about the true costs, ideal climate zones, and specific features that determine whether your air dome investment will succeed or fail.

    How Tennis Air Domes Work: Extending Your Season 6-8 Months

    When winter temperatures drop below freezing, tennis air domes create a controlled environment that transforms outdoor courts into year-round facilities.

    Your year round tennis air dome uses pressurized air to maintain structural integrity, with fabric membranes designed to withstand winds up to 90 mph and snow loads exceeding 30 pounds per square foot.

    The indoor tennis dome operates in climates from -10°F to 90°F, making it ideal for northern regions in zones 5-7.

    You’ll maintain consistent playing conditions regardless of external weather through automated climate control systems that regulate temperature, humidity, and air circulation.

    Your winter tennis facility extends the playing season by 6-8 months, enabling continuous operation when outdoor courts become unusable.

    This technology eliminates weather-related cancellations while protecting players from harsh conditions.

    Climate Zones Perfect for Tennis Air Dome Installation

    If you’re located in northern climate zones 5-7, you’ve found the sweet spot for tennis air dome installation.

    These regions experience temperature ranges from -10°F to 90°F (-23°C to 32°C), creating the perfect conditions where domes provide maximum seasonal extension without excessive energy costs.

    You’ll get the most value from your investment in these climates since they offer distinct seasons that naturally limit outdoor play for several months.

    Northern Zone Temperature Ranges

    As temperatures plummet in northern climates, tennis air domes become essential infrastructure for maintaining year-round play.

    You’ll find these structures most beneficial in USDA hardiness zones 5-7, where winter temperatures drop to -10°F (-23°C) and summer peaks reach 90°F (32°C). This dramatic temperature swing makes outdoor tennis impossible for 6-8 months annually without protection.

    Your all season tennis dome creates a controlled environment that maintains ideal playing conditions regardless of external weather.

    These temperature extremes define the sweet spot where air dome investment pays off dramatically. Southern regions don’t experience enough cold months to justify costs, while far northern zones face heating expenses that reduce profitability.

    You’re targeting the perfect climate zone where seasonal limitations create maximum demand for covered court solutions.

    Optimal Installation Climate Conditions

    Beyond temperature ranges, you’ll maximize your air dome investment by selecting locations with specific climate patterns that create sustained demand.

    Target areas where outdoor tennis becomes impossible for 4-6 consecutive months, creating desperate players yearning for indoor alternatives.

    Prime installation zones feature:

    • Harsh winters with heavy snow – Players can’t access outdoor courts from December through March, forcing them to abandon their tennis routines or pay premium rates for your covered facility.
    • Unpredictable spring weather – Late freezes and persistent rain create frustrated tennis enthusiasts who’ll gladly pay for guaranteed court time.
    • Short outdoor seasons – Limited playing months mean concentrated demand when you’re the only game in town.

    You’ll capture maximum revenue where climate creates genuine necessity, not mere convenience.

    Revenue Boost: $120K to $250K Additional Income Per Court

    A single court air dome covering 7,200 square feet can generate between $120,000 and $250,000 in additional annual revenue for your tennis facility.

    This substantial income boost comes from extending your operational season by 6-8 months in northern climates where temperatures drop as low as -10°F.

    You’ll capture revenue through winter lessons, which alone can increase your earnings by 60%.

    Year-round leagues provide consistent monthly income, while tournament hosting brings in substantial weekend revenues.

    Your facility becomes a regional destination when competitors shut down for winter months.

    The dome transforms dead winter months into profitable periods.

    Members who’d normally cancel memberships stay active, and you’ll attract new players seeking indoor courts during harsh weather conditions.

    Air Dome Installation Costs vs. Long-Term ROI

    You’ll need to weigh the upfront air dome installation costs against the substantial long-term returns on your investment.

    The initial expense includes the dome structure, foundation work, and mechanical systems, but revenue starts flowing immediately once you’re operational.

    Most facilities see full payback within 3-5 years, after which the additional $120K-$250K annually becomes pure profit enhancement.

    Initial Investment Breakdown

    While the upfront costs of air dome installation might seem substantial, the long-term financial returns make this investment increasingly attractive for tennis facility owners. You’re looking at several key components that determine your total investment.

    The primary expenses include:

    • Dome structure and materials – High-quality fabric, anchoring systems, and weather-resistant components that’ll withstand harsh northern winters.
    • Installation and site preparation – Professional setup, ground work, and utility connections that guarantee proper functionality.
    • Heating and ventilation systems – Energy-efficient equipment that maintains ideal playing conditions year-round.

    For a single court covering 7,200 square feet, you’ll typically invest between $80,000-$150,000 total.

    However, with potential additional revenue of $120K-$250K annually, most facilities recover their investment within 12-18 months while extending their season by 6-8 months.

    Revenue Generation Timeline

    Breaking down the revenue generation timeline reveals how quickly your air dome investment pays for itself through multiple income streams.

    You’ll see immediate returns once installation’s complete, typically generating $120K-$250K additional revenue annually from a single covered court.

    Your winter lesson programs launch immediately, capturing that essential 60% revenue boost during previously dormant months.

    Year-round leagues start within weeks, filling evening and weekend slots that weather once canceled.

    Tournament hosting becomes viable throughout extended seasons, attracting regional events and their associated fees.

    Most operators achieve break-even within 2-3 years, depending on local market conditions and pricing strategies.

    The 6-8 month season extension in northern climates transforms your facility from seasonal operation into consistent revenue generator, maximizing return on every square foot of court space.

    Payback Period Analysis

    Three key factors determine your air dome’s payback period: initial installation costs, annual revenue increases, and operational expenses.

    Most tennis facility owners see complete cost recovery within 3-5 years, with single-court installations averaging $80,000-$150,000 upfront investment.

    Your revenue calculations should include:

    • Winter lesson programs – capturing 60% more annual income during previously dead months
    • Year-round league fees – consistent membership retention instead of seasonal dropoffs
    • Tournament hosting revenue – becoming the go-to venue when outdoor courts aren’t viable

    Smart financing options reduce immediate cash flow impact.

    You’ll typically break even by year four, then enjoy pure profit for the dome’s 15-20 year lifespan.

    Consider maintenance costs, heating expenses, and insurance adjustments when calculating your specific ROI projections.

    High-Revenue Winter Programs: Leagues, Lessons, and Tournaments

    Transform your enclosed tennis facility into a revenue powerhouse during winter months by launching strategic programming that capitalizes on increased demand for indoor play.

    You’ll discover that winter lessons generate the highest profit margins, with players enthusiastic to maintain skills during off-season. Adult leagues become particularly lucrative as outdoor courts close, creating captive audiences willing to pay premium rates for consistent playing opportunities.

    Tournament hosting provides additional revenue streams through entry fees, concessions, and equipment sales. You can schedule weekend tournaments that attract players from surrounding regions seeking competitive indoor venues.

    Private lessons command higher rates during winter months due to limited facility availability. Corporate groups and clinics fill weekday slots, while junior programs expand as parents seek structured indoor activities.

    These diverse programming options maximize court utilization and revenue potential.

    Single vs. Multi-Court Air Domes: Sizing for Maximum Profit

    While single-court air domes require lower upfront investment, multi-court facilities deliver exponentially higher profits through economies of scale and programming flexibility.

    You’ll maximize revenue density with multi-court configurations. A single 7,200 sq ft dome generates $120K-$250K annually, but two courts sharing infrastructure costs dramatically improve your profit margins.

    Multi-court facilities enable simultaneous programming—leagues, lessons, and tournaments running concurrently.

    Consider these profit multipliers:

    • Shared operational costs – One heating/cooling system, single entrance, reduced staffing per court
    • Premium tournament hosting – Multi-court events command higher facility fees and attract sponsors
    • Flexible scheduling – Different skill levels, age groups, and programs operating simultaneously without conflicts

    Single-court domes work for smaller operations, but multi-court facilities typically achieve 40-60% better profit per square foot through operational efficiency and programming versatility.

    Tennis Air Dome Features That Maximize Year-Round Play

    Beyond choosing the right size configuration, specific air dome features determine whether your facility truly delivers profitable year-round operation or becomes a seasonal headache.

    Your dome’s foundation system must handle extreme temperature swings without compromising structural integrity. Look for reinforced concrete foundations with proper drainage systems that prevent ice damage and water pooling.

    Climate control systems separate successful operations from failed investments. You’ll need redundant heating units, automated ventilation, and humidity controls that maintain 65-75°F playing temperatures regardless of outside conditions.

    Essential Feature Revenue Impact
    LED lighting system Extends daily hours 4-6
    Emergency backup power Prevents costly shutdowns
    Automated entry systems Reduces staffing costs 30%
    Court surface heating Eliminates condensation issues
    Sound dampening panels Enables simultaneous bookings

    These investments directly translate into consistent year-round bookings and premium pricing during winter months.
  • Multi-Court Tennis Dome Planning

    Multi-Court Tennis Dome Planning

    When you’re considering a multi-court tennis dome, you’ll face decisions that’ll determine your facility’s success for decades. The choice between a 2-court setup for intimate community play or a 6-court complex capable of hosting tournaments isn’t just about space—it’s about understanding your market’s needs and growth potential. But before you can finalize court layouts, there’s a critical foundation issue that most planners overlook, and it could dramatically impact your construction timeline and budget.

    Tennis Dome Size Options: 2-Court, 4-Court, and 6-Court Layouts

    Three primary dome configurations dominate tennis facility planning, each offering distinct advantages based on your operational goals and available space.

    A 2-court multi court tennis dome requires 78′ x 200′ (15,600 sq ft), making it ideal for smaller communities or private clubs seeking cost-effective indoor play.

    The 4-court layout expands to 120′ x 200′ (24,000 sq ft), providing better operational efficiency and revenue potential through increased court utilization.

    For maximum capacity, 6-court facilities measure 120′ x 260′, accommodating tournaments and high-volume programs.

    Each configuration should include a pro shop ranging from 400-800 sq ft for equipment sales and administrative functions.

    Consider your membership size, budget constraints, and long-term growth projections when selecting your best multi court tennis dome configuration.

    Tennis Dome Construction Costs and Budget Planning

    Construction costs for multi-court tennis domes vary considerably based on size, materials, and regional factors.

    2-court facilities typically range from $200,000-$350,000, while 6-court complexes can exceed $600,000-$900,000.

    You’ll need to budget beyond the initial multiple tennis court bubble structure itself.

    Site preparation, including excavation and foundation work, typically adds $15,000-$40,000 depending on soil conditions.

    Electrical systems for lighting and HVAC require $20,000-$50,000, while proper ventilation systems cost another $25,000-$60,000.

    Don’t overlook ongoing operational expenses when planning your budget.

    Monthly utility costs range from $800-$2,500 depending on dome size and climate.

    Annual maintenance, including fabric repairs and equipment servicing, typically runs $5,000-$15,000.

    Factor in insurance premiums of $3,000-$8,000 annually for extensive coverage.

    Foundation, Electrical, and HVAC Requirements

    While tennis dome structures appear straightforward from the outside, you’ll need robust infrastructure systems to guarantee year-round playability and safety.

    Your foundation must handle both the building’s weight and wind uplift forces, requiring engineered concrete footings that extend below frost lines.

    For electrical systems, plan 200-amp service minimum for a 2-court tennis facility dome, scaling to 400-amp for 6-court layouts. You’ll need adequate lighting with 50-75 foot-candles uniformly distributed across playing surfaces.

    HVAC systems prove critical for maintaining ideal playing conditions.

    Design for 65-75°F temperatures with 45-55% humidity levels. Calculate one air change per hour minimum, with proper ventilation preventing condensation on dome surfaces.

    Include emergency backup systems for power outages, ensuring your facility remains operational during extreme weather when indoor tennis becomes most valuable.

    Heating and Ventilation Systems for Indoor Tennis Courts

    Proper heating and ventilation systems form the backbone of successful indoor tennis operations, directly impacting player comfort, court conditions, and your facility’s energy costs. Your large tennis air dome requires specialized HVAC systems that maintain consistent temperatures while managing humidity levels and air circulation patterns.

    System Component Specification Benefits
    Air Exchange Rate 4-6 changes/hour Prevents condensation, maintains air quality
    Temperature Control 60-70°F playing surface Ideal player comfort, equipment protection
    Humidity Management 40-60% relative humidity Prevents court damage, reduces injury risk

    You’ll need to install multiple air handling units with variable speed controls to accommodate different occupancy levels. Position intake and exhaust vents strategically to eliminate dead air zones while preventing drafts that could affect ball trajectory during play.

  • Pickleball Air Dome Guide 2026

    Pickleball Air Dome Guide 2026

    You’re considering a pickleball air dome for 2026, but the investment goes far beyond the initial $15,000-$50,000 price tag. While installation costs grab your attention first, the real challenge lies in understanding the complex web of ongoing expenses, regulatory requirements, and operational decisions that’ll determine whether your facility thrives or struggles. The difference between a profitable year-round operation and a costly mistake often comes down to details most owners discover too late.

    Pickleball Air Dome Costs: Installation and Long-Term Investment

    Installing a pickleball air dome requires a significant upfront investment, but it’ll pay dividends through year-round play and reduced long-term facility costs.

    You’ll typically spend $15,000-$25,000 per court for a basic pickleball air dome installation, including foundation work and equipment. Premium indoor pickleball dome systems with advanced climate control can reach $35,000-$50,000 per court.

    However, your pickleball court cover eliminates weather cancellations, extending your playing season by 3-4 months annually.

    You’ll save on court resurfacing costs since the dome protects against UV damage and weather deterioration. Energy-efficient LED lighting and insulation systems keep operational costs manageable at $200-$400 monthly for heating and cooling.

    Most facilities recoup their investment within 2-3 years through increased membership and court rental revenue.

    Air Dome Size Requirements and Multi-Court Layout Options

    Three key dimensions determine your pickleball air dome’s functionality: court size, buffer zones, and ceiling height.

    Each court requires a minimum 20′ x 44′ playing surface, but you’ll want 30′ x 64′ including safety buffers. Your dome needs at least 20′ ceiling height for proper ball clearance.

    When planning your pickleball bubble facility, consider these multi-court configurations:

    1. Single court setup – 30′ x 64′ dome for recreational use
    2. Four-court layout – Fits within standard tennis court footprint
    3. Eight-court facility – 100′ x 150′ dome maximizes player capacity
    4. Twelve-court complex – Premium configuration for tournament play

    Larger facilities offer better economies of scale and revenue potential.

    You’ll need 30-50 foot candles of lighting throughout. The eight-to-twelve court range provides the best balance between investment costs and operational efficiency for most commercial operations.

    Types of Pickleball Air Dome Structures and Material Choices

    Single-membrane structures use one fabric layer with continuous air pressure, creating cost-effective solutions for seasonal use.

    Double-membrane systems feature two fabric layers with insulating air space between them, delivering superior energy efficiency and year-round comfort in harsh climates.

    Your climate determines ideal material choice.

    Hot regions benefit from reflective white fabrics reducing cooling costs.

    Cold areas require insulated double-membrane construction preventing condensation and heat loss.

    Site Preparation and Permit Requirements for Air Dome Installation

    You’ll need to establish proper foundation requirements before installing your pickleball air dome, which typically involves creating a level concrete pad or reinforced surface that can support the structure’s anchoring system.

    The zoning permit process requires you to submit detailed site plans and structural specifications to your local building department, often taking 4-8 weeks for approval.

    You must also verify that your property meets setback requirements and doesn’t violate any height restrictions or noise ordinances in your area.

    Foundation Requirements Planning

    Before your pickleball air dome can provide year-round playing conditions, you must establish a solid foundation that meets both structural requirements and local building codes.

    Your foundation serves as the critical anchor point for the dome’s inflation system and structural integrity.

    Consider these essential foundation requirements:

    1. Concrete perimeter footing – Install reinforced concrete footings around the dome’s perimeter to secure anchor points and handle wind loads.
    2. Interior court surfacing – Choose between concrete, asphalt, or specialized court surfaces that provide proper drainage and player safety.
    3. Utility integration – Plan for electrical conduits, HVAC connections, and plumbing rough-ins before pouring concrete.
    4. Frost protection – Make certain footings extend below frost line in cold climates to prevent heaving and structural damage.

    Professional engineering consultation guarantees your foundation meets manufacturer specifications and local requirements.

    Zoning Permit Process

    While your foundation plans take shape, securing proper zoning permits becomes your next critical milestone in the air dome installation process.

    You’ll need to contact your local zoning board early since approval timelines vary greatly between jurisdictions. Most municipalities classify air domes as temporary or semi-permanent structures, but specific regulations differ widely.

    Start by requesting a pre-application meeting to discuss your project’s scope and requirements. You’ll typically need site plans, structural drawings, and proof of liability insurance.

    Commercial zones generally offer smoother approval paths than residential areas, where noise and traffic concerns may arise.

    Submit applications for building permits, special use permits, and potentially conditional use permits.

    Factor in 60-90 days for processing, as appeals or modifications can extend timelines considerably.

    Climate Control and Lighting Systems for Year-Round Play

    You’ll need a robust HVAC system to maintain consistent temperatures and air circulation throughout your dome’s interior space.

    Your lighting setup must meet the 30-50 foot candles standard using energy-efficient LED fixtures that won’t overheat the enclosed environment.

    These two systems work together to create comfortable playing conditions regardless of outside weather.

    HVAC System Requirements

    Although air domes provide excellent protection from outdoor elements, they require sophisticated HVAC systems to maintain ideal playing conditions throughout the year.

    You’ll need to take into account several critical factors when designing your climate control system.

    Your HVAC system must handle unique challenges that standard indoor facilities don’t face:

    1. Temperature regulation – Maintain 65-75°F (18-24°C) for optimal player comfort and ball performance
    2. Humidity control – Keep levels between 40-60% to prevent condensation on dome surfaces
    3. Air circulation – Guarantee consistent airflow throughout the space without creating drafts that affect ball trajectory
    4. Pressurization balance – Maintain proper air pressure to keep the dome inflated while providing fresh air exchange

    You’ll also need backup systems to prevent dome collapse during equipment failures, making redundancy essential for safe operation.

    LED Lighting Standards

    Proper lighting becomes just as important as climate control when creating an ideal playing environment inside your air dome.

    You’ll need to maintain 30-50 foot candles of uniform illumination across all court surfaces to guarantee players can track the ball effectively during fast-paced rallies.

    LED fixtures offer the best solution for pickleball air domes because they’re energy-efficient, generate minimal heat, and provide consistent light output.

    You should position lights at least 20 feet above the playing surface to prevent glare and shadows that could interfere with gameplay.

    Install fixtures strategically to eliminate dark spots, particularly at net areas where most volleys occur.

    Consider dimming capabilities for different skill levels and training sessions.

    Quality LED systems will reduce your operational costs while delivering the bright, even lighting that serious pickleball players demand.

    Air Dome Maintenance Costs and Seasonal Operations

    When planning your pickleball air dome facility, understanding maintenance costs and seasonal operations will greatly impact your budget and profitability.

    You’ll need to account for ongoing expenses that keep your facility running smoothly throughout different seasons.

    Your primary maintenance considerations include:

    1. HVAC system servicing – Regular filter changes, blower maintenance, and seasonal tune-ups typically cost $2,000-4,000 annually.
    2. Fabric inspection and repairs – Minor patching and seam maintenance runs $500-1,500 per season.
    3. Anchor system checks – Foundation and tie-down inspections guarantee structural integrity for $300-800 yearly.
    4. Winter weatherization – Snow load management and heating costs can add $1,000-3,000 monthly in cold climates.

    You’ll also face seasonal operational adjustments, including increased heating costs during winter months and potential temporary deflation during severe weather events.

  • Basketball Air Dome Facilities

    Basketball Air Dome Facilities

    You’re facing a tough decision about indoor basketball facilities, and air domes might be the game-changer you haven’t considered. These pressurized structures offer regulation court dimensions at a fraction of traditional construction costs, but they come with unique challenges you’ll need to navigate. From climate control complications to safety protocols, there’s more to these inflatable venues than meets the eye. The question isn’t whether they work—it’s whether they’ll work for your specific situation.

    How Do Basketball Air Domes Compare to Traditional Indoor Courts?

    While traditional indoor courts offer permanent structures with rigid construction, basketball air domes provide you with a flexible, cost-effective alternative that meets the same official playing standards.

    You’ll find that an indoor basketball dome delivers identical court dimensions—50′ x 94′ for NCAA or 50′ x 84′ for high school—with proper 25-35′ ceiling clearance for optimal shooting trajectories.

    Unlike conventional gyms requiring extensive foundations and steel frameworks, a basketball air dome installs quickly on minimal groundwork.

    You’ll save considerably on construction costs while maintaining professional lighting standards of 50-70 foot candles and regulation hardwood or synthetic flooring.

    Your basketball training facility dome offers year-round climate control, protecting players from weather disruptions.

    You can relocate or expand these structures more easily than permanent buildings, making them ideal for growing programs.

    What Size Basketball Air Dome Do You Need?

    Determining your basketball air dome size depends on your specific court requirements and intended use. You’ll need different dimensions based on your playing level.

    For NCAA competition, your basketball court dome must accommodate a 50′ x 94′ court, while high school games require 50′ x 84′ space.

    Don’t forget the minimum 25′ clear height requirement, though 35′ is preferred for ideal shooting trajectories.

    Consider additional space around the court perimeter for player safety and spectator seating. You’ll also need room for entrance areas, equipment storage, and HVAC systems.

    Multi-court facilities require proportionally larger domes with adequate spacing between courts.

    Factor in your budget, available land, and local building codes when selecting your dome size. Consulting with air dome manufacturers guarantees you’ll get accurate specifications for your specific needs.

    Should You Buy or Rent a Basketball Air Dome Facility?

    When deciding between purchasing or renting a basketball air dome facility, you’ll face a significant financial choice that impacts your long-term operations.

    Purchasing offers complete control, potential tax benefits, and equity building, but requires substantial upfront capital—typically $200,000-$500,000 for a regulation-sized facility. You’ll also handle maintenance, insurance, and operational costs.

    Renting provides lower initial investment and includes maintenance coverage, making it ideal for seasonal programs or testing market demand. However, you’ll lack ownership benefits and face ongoing monthly payments without building equity.

    Consider your budget, intended usage duration, and growth projections. If you’re planning long-term operations exceeding five years, purchasing often proves more economical.

    For short-term needs or limited budgets, renting offers flexibility without major financial commitment.

    What Climate Control Features Matter Most in Air Domes?

    Beyond the financial considerations of acquiring your air dome, the climate control system directly impacts player performance and facility usability year-round. You’ll need consistent temperature control between 65-72°F to maintain ideal playing conditions and prevent condensation issues that damage equipment and create slippery court surfaces.

    Feature Benefit Impact
    HVAC System Temperature regulation Consistent 65-72°F playing environment
    Dehumidification Moisture control Prevents condensation, maintains grip
    Air Circulation Fresh air exchange Reduces CO2 buildup, improves air quality

    Your ventilation system should provide 6-8 air changes per hour to prevent stuffiness during peak usage. Proper humidity control between 30-50% relative humidity guarantees player comfort while protecting your hardwood flooring investment from warping or buckling due to moisture fluctuations.

    Professional Court Standards: Lighting and Flooring Requirements

    You’ll need proper lighting that meets the 50-70 foot candles standard to guarantee players can track the ball clearly during fast-paced games.

    Your flooring choice between traditional hardwood and modern synthetic surfaces will directly impact player performance, safety, and long-term maintenance costs.

    These professional court standards aren’t just recommendations—they’re essential requirements that determine whether your air dome facility can host competitive basketball at any level.

    Optimal Lighting Standards

    Proper illumination guarantees players can track the ball accurately during fast-paced gameplay and execute precise shots without visual strain.

    You’ll need to maintain consistent lighting levels throughout your air dome to prevent shadows that could affect player performance and safety.

    Your basketball air dome requires these essential lighting specifications:

    1. Minimum illumination: 50 foot candles across the entire playing surface
    2. Ideal range: 70 foot candles for enhanced visibility during competitive play
    3. Uniform distribution: Even light spread eliminates dark spots and glare zones
    4. LED fixtures: Energy-efficient systems that provide consistent color temperature and longevity

    You should position lights strategically to minimize shadows behind backboards and along sidelines.

    Consider installing dimmer controls to adjust brightness for different activities, from casual practice sessions to tournament-level competition, ensuring ideal visual conditions for every game situation.

    Hardwood Flooring Specifications

    Three critical factors determine professional-grade hardwood flooring performance in basketball air domes: material composition, subfloor construction, and surface finish specifications.

    You’ll need northern hard maple as your primary flooring material, meeting MFMA (Maple Flooring Manufacturers Association) Grade 1 standards. This dense hardwood provides ideal ball bounce consistency and player traction while withstanding intense gameplay.

    Your subfloor system requires a vapor barrier, sleeper construction with proper spacing, and shock-absorption padding. You can’t compromise on this foundation—it directly affects player safety and floor longevity.

    Surface finish demands polyurethane coating with specific slip-resistance coefficients. You’ll apply multiple coats to achieve the required durability and maintain consistent ball bounce characteristics.

    Regular maintenance includes daily cleaning, periodic refinishing, and humidity control between 30-50% to prevent warping or cracking.

    Synthetic Surface Options

    While hardwood remains the gold standard, synthetic flooring systems offer compelling alternatives that meet professional basketball requirements at reduced maintenance costs.

    You’ll find modern synthetic surfaces deliver consistent ball bounce, excellent traction, and durability that withstands your air dome’s temperature fluctuations. These systems resist moisture damage and require minimal upkeep compared to traditional hardwood.

    Key synthetic flooring options include:

    1. Modular interlocking tiles – Easy installation with shock-absorbing underlayment systems
    2. Sheet vinyl sports surfaces – Seamless construction with built-in cushioning layers
    3. Rubber composite flooring – Superior impact absorption with slip-resistant textures
    4. Multi-layer synthetic systems – Engineered substrates with performance topcoats

    You’ll appreciate that quality synthetic surfaces meet official court specifications while providing consistent playability year-round in your controlled environment.

    Safety Inspections and Maintenance for Air Dome Operations

    You’ll need to establish rigorous inspection protocols to guarantee your air dome maintains structural integrity throughout its operational life.

    Regular air pressure monitoring becomes critical since pressure fluctuations can compromise the dome’s stability and create safety hazards for players and spectators.

    Schedule systematic checks of all structural components, seams, and anchoring systems to prevent catastrophic failures that could endanger everyone inside your facility.

    Structural Integrity Checks

    Regular structural integrity checks form the backbone of safe air dome operations, requiring systematic evaluation of every component that maintains your facility’s pressurized environment.

    You’ll need to implement thorough inspection protocols that address both visible and hidden structural elements.

    Focus your structural assessments on these critical areas:

    1. Foundation anchoring systems – Inspect concrete footings, tie-downs, and ground attachment points for cracks, corrosion, or loosening.
    2. Membrane fabric condition – Check for tears, punctures, UV degradation, and seam separation across the entire dome surface.
    3. Cable and tensioning hardware – Examine guy wires, turnbuckles, and support cables for fraying, rust, or improper tension.
    4. Emergency exit integrity – Verify door seals, airlock functionality, and structural mounting remain secure.

    Schedule these inspections quarterly, with additional checks following severe weather events.

    Air Pressure Monitoring

    Air pressure monitoring serves as your most critical real-time safety system, working hand-in-hand with the structural components you’ve just inspected to maintain your dome’s stability.

    You’ll need automated pressure sensors that continuously track internal air pressure levels and alert you to dangerous fluctuations before they compromise structural integrity.

    Install redundant monitoring systems with digital displays showing real-time pressure readings. Set up automatic alarms that activate when pressure drops below safe thresholds, giving you time to engage backup blowers or evacuate players if necessary.

    You should establish minimum pressure requirements based on wind conditions and occupancy levels.

    Check your monitoring equipment weekly, calibrating sensors monthly to guarantee accuracy.

    Document all pressure readings and maintain detailed logs for insurance and safety compliance purposes.